Brand new factsheets!

March 16, 2016


We are excited to share two new factsheets with you!  We have been getting lots of inquiries about tumbler composters and bokashi and we decided to put together a factsheet for each one to help answer your questions and spark your interest.  If the descriptions below spark your interest, check out the new additions on our factsheets page.

bokashi

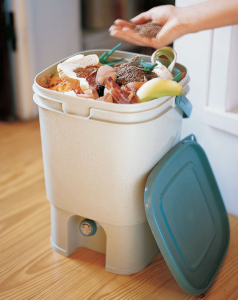
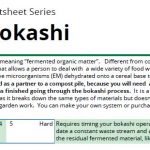
Bokashi is a Japanese term meaning “fermented organic matter”. Different from composting, which is aerobic, it is an anaerobic process that allows a person to deal with a wide variety of food waste on-site. Bokashi harnesses the power of effective microorganisms (EM) dehydrated onto a cereal base to carry out the fermentation process . It is best used as a partner to a compost pile, because you will need a place to compost the ‘spent’ material once it has finished going through the bokashi process. It is a great alternative to the green cone food digester as it breaks down the same types of materials but doesn’t need sunlight or to be buried down 2 feet in your garden work. You can make your own system or purchase a ready-to-use unit.


tumbler

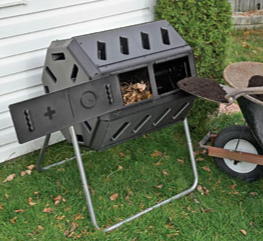
In general, tumbler composters are in the form of a barrel mounted on a stand so the unit can be turned or “tumbled” around a central axis.  They can be mounted horizontally or vertically, both work  well.  Turning these units easily incorporates air into the material inside the tumbler, which can speed up the decomposition process.  It is possible that you may get a finished product faster than with passive backyard composting due to the increased aeration that tumblers make possible.  However, beware of manufacturers that say you will have finished compost in three weeks or less – anything that looks finished in this short amount of time will be unstable and need to sit for at least 6-8 weeks longer to cure.


greenhouse

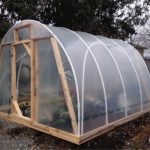
When we built our new greenhouse wanted the plans for this project to be free and readily accessible.  As such, this factsheet includes a budget and materials list for the greenhouse, a list of the lessons I learned, and some photos of the building process.


Posted in Blog, Composting, Fact Sheet, Featured, Organic Gardening, Waste DiversionTagged , , , , ,

New Greenhouse: Lessons, Budget, Design

March 31, 2014


It’s a sad truth:  greenhouses don’t last forever.  At least not the common poly-and-PVC DIY kind.  Our plastic was tearing and I could stand the blaring red Tuck-Tape no longer, so it was time to tear down and build back up.

My dream: to be able to enter and exit the greenhouse without bumping my forehead, spin around inside it with my arms spread wide, and have it be roomy enough to grow some blue-ribbon tomatoes and peppers.  That last one will likely remain a dream, but the other two were accomplished!

I enlisted the expertise of Jesse Brown from Victoria Aquaponics to help me with the design and installation, as well as the muscles of a couple dear volunteers to help with the demolition of the old greenhouse.

Vital stats:

  • Dimenions: 12’x12’x8′
  • Length of hoops: 22ft
  • Dimensions of plastic: 2 pieces at 12’x14′, 1 piece at 12’x16′
  • Time to raise the frame and put roof plastic on: 7 hours (1 day)
  • Time to wrap and tighten plastic on ends and roof: 4 hours
  • Cost of materials: ~$600 (I bought everything new, and we get a discount at Castle Building, so true cost may be slightly higher.  This could definitely be off-set by scavenging for used/free materials.  Try UsedVictoria or Craigslist).

Here we go! (click the photos to enlarge)

Ready to retire..
Ready to retire..
Louis Greenhouse
Rock star volunteer Louis taking a break from pulling the dreaded rebar out of the ground.
Greenhouse door down 1
Timberrrr!
Greenhouse door down 4
Bam!
Greenhouse down1
Greenhouse down…
Got ‘er level!
New hoops raise the height of the new greenhouse to 8 ft…and save me from so much forehead-banging.
rebar
Rebar pounded 2′ into the ground, secured to base with metal strapping. PVC slides over rebar, secured to frame with clamp and screws. Hoops were placed every 3 feet.
angle cut Jess
Jess takes care of the angle cuts for the end frames, only 4 total for the whole greenhouse!
plastic on
Ends framed, plastic on.
thumb's up
My thoughts at the end of the day.
Plastic-wrapping the ends…
Definitely a two-person job!
Finished greenhouse
Side-support hoops a la Mason Street City Farm!
corner secure
Side-support hoops (on the left) are secured in the corners with metal strapping and screws…
zap straps
…and secured to each cross-hoop with an X of zap straps.
door
The door. Note placement of hinges!
DSCN0011
Aaaand fin!  It’s raining…but we’re DRY! What the greenhouse is truly meant for: sipping coffees and looking good.

What I learned:

Ask for help!  Wrapping the greenhouse in plastic and then tightening is something that can be done by one person, but you will never want to build another greenhouse again and your plastic will likely end up with holes/mis-cuts in it (either from you making a mistake or literally just loosing it and taking the scissors to it to release some frustration).  I could not have done this project as fast or with as much enjoyment without the help of Jess of Victoria Aquaponics, the always friendly and knowledgeable folks at Cook St. Castle and Louis, one of our long-standing (long-suffering?) volunteers.

Spray-paint the PVC before installing.  The PVC and the plastic react with each other in sunlight, making the plastic break down and split over time (note where the red Tuck-Tape is in the first picture). Having a protective layer between the plastic and the PVC extends the life of your plastic.

PVC stands for polyvinyl chloride.”Poly” refers to the polyethylene plastic you will cover your greenhouse in.  There are lots of different kinds of poly.  You want 6mm with a UV barrier, possibly a condensation barrier too.  Integrity Sales stocks this and sells it by the square foot.  BW Greenhouse in Abbostford has the UV + condensation barrier kind.

Always check that things are level, measure twice and take your time!

Open source

I wanted this to be a free and easily accessible project.  So: a rough budget for this greenhouse is below, you can click on the photos above to enlarge them and get a better view of how it’s put together and you can call the Centre if anything is unclear.  May the future bring you many, many completely ripe tomatoes! 

Posted in Blog, FeaturedTagged , , 1 Comment on New Greenhouse: Lessons, Budget, Design